
French Press Brew Guide - Hacked!
Some of my earliest memories of making coffee at home, many years ago as a student, involve crappy French press brews. It was always something people would talk about: “oh, you love coffee? You need to get a French press then!” or “French press coffee is the best way to make coffee at home,” all told to me by self-proclaimed coffee snobs. So off I went and bought one, along with some pre-ground grocery store coffee (*shudders*), and made the best swill I could. I had no idea what I was doing: third wave coffee barely just started, YouTube didn’t exist (yeah, I’m old…), and there weren’t any handy brew guides within a few mouse clicks. Even with my uninitiated palate and bang-up recipe I never liked it (what a shock!), and years later when I got into specialty coffee, I still associated French press with that terrible, stale, muddy swamp water I drank while cramming for an exam.
But, when I think about what a French press brew actually is, it is essentially the closest/purest expression of a coffee. The brewing style mimics a “cupping,” which is the procedure for assessing a coffee’s quality (much in the way that a sommelier would sniff, slurp, and hold a tilted glass of wine up to the light). The practice of cupping entails grinding coffee, putting it into a ceramic bowl, pouring hot water over it, and letting it steep for four minutes; basically the same procedure for making French press brews. The reason I say that this is a pure expression of the coffee, is that it is unfiltered (no paper filter), and minimally manipulated (no pressure, no vacuum, no special pouring). After those four minutes, you’re left with a coffee that should tell you a story— showing its character, ie., varietal, terroir, processing, degree of fermentation, quality of green coffee storage/transportation, harvest time, and finally the last step in the chain— roast quality. The coffee has nothing to hide behind.
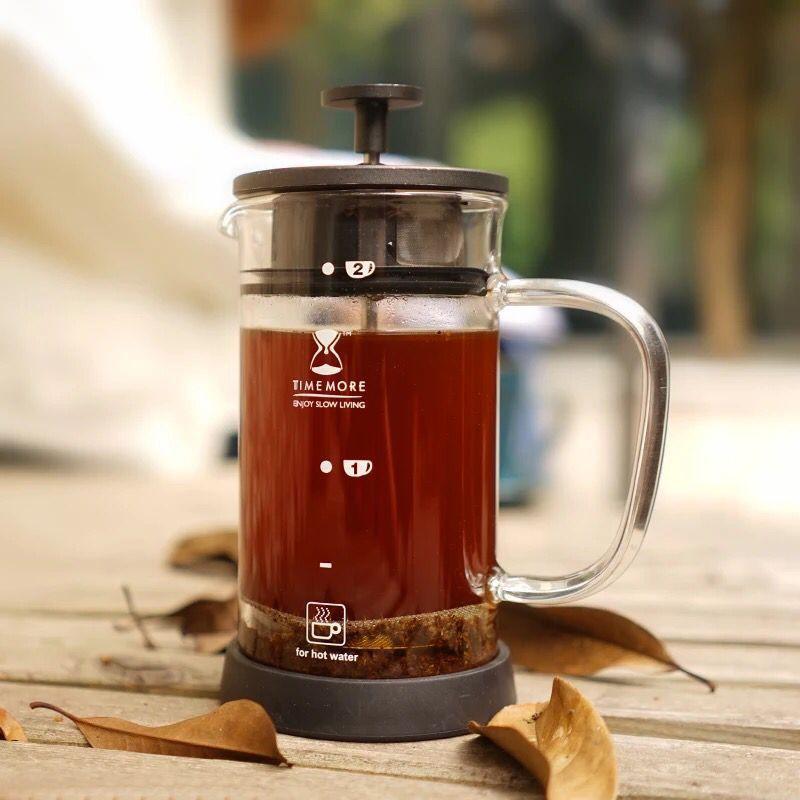
The main reason I always wrote off French press coffee though, was that I was missing out on a few tricks that can vastly improve the final result. I knew what I wanted—a well-extracted cup that was sweet, full-bodied, and not muddy—but didn’t know how to get there. My issues: the ratios were off, my steeping time was inconsistent, my grind was too course, and I was impatient. But with good water, fresh coffee, the right grind and good timing, you can enjoy a delicious cup at home. The best thing about French press brewing is that you only need a few things: water, kettle, spoon, coffee, and the brewer itself. And if you might want to upgrade your French press we have so many options, from deluxe Espro double-walled stainless (think: unbreakable, amazing heat-retention), to gorgeous HARIO glass pots with wood accents (very classy addition to any kitchen), to my current favourite: the Timemore French Press. This particular brewer is designed to do both tea, and coffee, and like the HARIO Trebi, or Espro pots, it has a fine mesh screen to filter out those pesky grinds— giving you a cleaner cup. That said, your current French press will work just fine! The secret to this recipe though, to a truly cleaner cup (something French presses are notoriously NOT known for) are three key hacks. The first is skimming off the foam at the top of the brew, then having patience and waiting for around eight minutes total, and lastly not pushing the plunger all the way to the bottom, as you decant. I will explain these hacks in detail below, where I outline my recipe: a hybrid of different ones I’ve seen online, as well as James Hoffman’s 2016 YouTube tutorial, and Chris Baca’s 2017 YouTube tutorial. I can happily say that using this recipe has helped to alter my perception of French press coffee… it’s been a game-changer! The recipe works well with a standard 600ml press pot, which would make two small cups for you and a friend to share.
The recipe:
Dose: 25g | Water weight: 375g | Ratio: 15 : 1 | Brew time: 4:00 - 9:00
Prep protocol
1. Fill kettle to maximum volume, and set to 210F
2. Grind your coffee at a medium grind— NOT a super course grind like 9/10 French press recipes suggest
3. Once boiling, remove kettle from heat source, and pour a small amount of hot water into the pot to pre-heat and rinse it
4. Place pre-heated pot onto a scale, add the coffee, and tare it
Brewing protocol
1. Start timer and add just-off-boiling water (207F) to full weight (375g) while pouring in circles to ensure saturation of grinds
2. Now wait for 4:00 and do not place plunger on top of pot
3. It is important to stop the extraction at 4:00; to do this use a spoon to gently break the crust with light stirring— make sure to not overly agitate the coffee
4. Take two spoons and carefully remove the foam that is covering the surface, discard into sink. This may seem awkward to manipulate at first, but this important step will remove the bitter and oily sludge, which means a cleaner cup
5. This is where the variable brewing time comes into play: you can wait for another minute and decant your brew at 5:00, but the longer you wait, the more sediment sinks to the bottom, and in turn, your final result is even less gritty and sweeter
6. At 8:00 take your plunger and DO NOT PLUNGE to the bottom as this will disturb and churn up all those grinds which we patiently waited for to settle. Instead think of the plunger and metal screen as a final filter, and hold it just above the surface of the coffee.
7. Carefully decant the coffee through the metal screen into your cups.
8. Enjoy!
Have a look at some of our fine French Press pots available now!
Previous article

Next article


